-
Clone
git://git.kernel.org/pub/scm/linux/kernel/git/stable/linux.git
https://git.kernel.org/pub/scm/linux/kernel/git/stable/linux.git
https://kernel.googlesource.com/pub/scm/linux/kernel/git/stable/linux.git
-
Clone
https://github.com/torvalds/linux.git
git@github.com:torvalds/linux.git
-
Linux kernel stable tree mirror
Clone
https://github.com/gregkh/linux.git
git@github.com:gregkh/linux.git
-
https://mirrors.tuna.tsinghua.edu.cn/help/linux-stable.git/
如需克隆 Linux Stable 代码,使用:
git clone https://mirrors.tuna.tsinghua.edu.cn/git/linux-stable.git
若要将 mirror 加入已有代码库,可在已有仓库中运行:
git remote add mirror https://mirrors.tuna.tsinghua.edu.cn/git/linux-stable.git
或运行:
git remote set-url origin https://mirrors.tuna.tsinghua.edu.cn/git/linux-stable.git
将默认上游设置为镜像站。
Debian Linux Kernel Handbook:
# 克隆 Debian 内核团队的 Linux 内核源代码仓库到本地
git clone https://salsa.debian.org/kernel-team/linux.git debian-linux

# 切换到 debian/6.1.99-1 分支,并基于该分支创建一个本地分支 debian/6.1.99-1
git checkout -b debian/6.1.99-1 debian/6.1.99-1

# 显示当前分支的版本描述,确认是否正确切换到 6.1.99-1 分支
git describe

# 使用远程上游 Linux 内核仓库生成 orig tarball(已注释,选择其一)
#debian/bin/genorig.py https://git.kernel.org/pub/scm/linux/kernel/git/torvalds/linux.git

# 使用本地上游内核仓库(~/code/linux)生成 orig tarball,生成 ../linux_6.1.99.orig.tar.xz
debian/bin/genorig.py ~/code/linux

# 运行 debian/rules 的 orig 目标,将 orig tarball 与 Debian 打包文件整合
debian/rules orig

# 运行 debian/rules 的 debian/control 目标,生成 debian/control 文件,定义要构建的包
debian/rules debian/control

# 安装当前目录(.)的构建依赖,确保所有编译所需的工具和库都已安装
apt build-dep .

# 构建二进制包(.deb),不生成源码包(-b),不签名(-uc -us),使用 32 线程并行编译(-j32)
#dpkg-buildpackage -b -uc -us -j32

# 生成所有二进制包,包括内核、文档、源码等
debian/rules binary

# 使用32线程编译,仅生成当前架构(如 amd64)的二进制包
FEATURESET=none DEB_BUILD_OPTIONS=parallel=32 debian/rules binary-arch

# debian/build,setup none、clond、rt
make -f debian/rules.gen setup_amd64

# debian/build,setup none
make -f debian/rules.gen setup_amd64_none_amd64

# 仅编译none架构的内核
make -f debian/rules.gen build-arch_amd64_none_amd64

# 仅将none内核打成deb包
make -f debian/rules.gen binary-arch_amd64_none_amd64

# 仅编译perf deb包
make -f debian/rules.gen binary-arch_amd64_real_perf
cd ~/code/linux,合并多个config配置文件,前面的setup也会调用scripts/kconfig/merge_config.sh:
查看当前debian内核源码版本:
wujing@debian:~/code/debian-linux$ git log --oneline -1
70db2e3f96 (HEAD -> debian/latest, tag: debian/6.19_rc4-1_exp1, origin/debian/latest, origin/HEAD) Prepare to release linux (6.19~rc4-1~exp1)wujing@debian:~/code/linux$ git log --oneline -1
944aacb68baf (HEAD -> wujing/bpf/verifier/baseline, torvalds/master, torvalds/HEAD, torvalds/master) Merge tag 'scsi-fixes' of git://git.kernel.org/pub/scm/linux/kernel/git/jejb/scsicd ~/code/linux~/code/linux/scripts/kconfig/merge_config.sh ~/code/debian-linux/debian/config/config ~/code/debian-linux/debian/config/kernelarch-x86/config ~/code/debian-linux/debian/config/amd64/configmake bindeb-pkg -j32基于上方debian-linux内核合并后的config,额外打开了一些编译选项:
./scripts/config --enable CONFIG_VXLAN
./scripts/config --enable CONFIG_MPLS_ROUTING
./scripts/config --enable CONFIG_MPLS_IPTUNNEL
./scripts/config --enable CONFIG_IPV6_TUNNEL
./scripts/config --enable CONFIG_IPV6_GRE
./scripts/config --enable CONFIG_NET_IPGRE
./scripts/config --enable CONFIG_NET_IPGRE_DEMUX
make savedefconfig拷贝到指定目录保存defconfig(备用):
cp defconfig ~/home/wujing/code/~realwujing.github.io/linux/kernel/defconfigcp ~/home/wujing/code/~realwujing.github.io/linux/kernel/defconfig .configmake olddefconfig使用LLVM编译内核:
make LLVM=1 bindeb-pkg -j32 LOCALVERSION=-baseline-944aacb68baf使用LLVM编译BPF selftests:
make -C tools/testing/selftests/bpf/ LLVM=1 -j32~/code/linux:https://github.com/torvalds/linux.git
~/code/debian-linux:https://salsa.debian.org/kernel-team/linux.git
-
https://learn.microsoft.com/en-us/community/content/wsl-user-msft-kernel-v6
-
https://learn.microsoft.com/en-us/windows/wsl/wsl-config#configure-global-options-with-wslconfig
-
SHA and HMAC algs using patches
+ sha512hmac ./vmlinuz-5.10.0-136.12.0.90.ctl3.x86_64
libkcapi - Error: Netlink error: cannot open netlink socket
libkcapi - Error: Netlink error: cannot open netlink socket
libkcapi - Error: NETLINK_CRYPTO: cannot obtain cipher information for hmac(sha512) (is required crypto_user.c patch missing? see documentation)
Allocation of hmac(sha512) cipher failed (ret=-93)
error: Bad exit status from /var/tmp/rpm-tmp.cDI4EA (%install)


RPM build errors:
    line 162: It's not recommended to have unversioned Obsoletes: Obsoletes: kernel-tools-libs
    line 177: It's not recommended to have unversioned Obsoletes: Obsoletes: kernel-tools-libs-devel
    Bad exit status from /var/tmp/rpm-tmp.cDI4EA (%install)
wsl2内核开启CONFIG_CRYPTO_USER可修复此bug:
make menuconfig KCONFIG_CONFIG=Microsoft/config-wsl
CONFIG_CRYPTO_USER=y # 启用CONFIG_CRYPTO_USER
make -j$(nproc) KCONFIG_CONFIG=Microsoft/config-wsl
make modules_install headers_install
cp arch/x86/boot/bzImage /mnt/c/Users/17895/BzImage
# 编辑C:\Users\17895\.wslconfig
[wsl2]
kernel=C:\\Users\\17895\\bzImage
-
[wsl2]

# Enable experimental features
[experimental]
sparseVhd=true
PS C:\Users\17895> wsl -l 适用于 Linux 的 Windows 子系统分发: Ubuntu-24.04 (默认) docker-desktop PS C:\Users\17895> wsl -l -v NAME STATE VERSION * Ubuntu-24.04 Stopped 2 docker-desktop Stopped 2 PS C:\Users\17895> wsl --shutdown PS C:\Users\17895> wsl --manage Ubuntu-24.04 --set-sparse true 正在进行转换,这可能需要几分钟时间。 操作成功完成。 PS C:\Users\17895> wsl --manage docker-desktop --set-sparse true 正在进行转换,这可能需要几分钟时间。 操作成功完成。
Linux 内核相关网站的出现顺序:
-
LKML.org
- 简介:LKML(Linux Kernel Mailing List)是 Linux 内核开发者的主要讨论平台。邮件列表自 1991 年 Linux 内核项目开始时就存在,但 LKML.org 作为便于访问和搜索的网页形式出现时间稍晚,具体时间不详。
- 网址:https://lkml.org/
-
LWN.net
- 成立时间:1998 年
- 简介:LWN.net 是一个提供 Linux 和开源软件相关新闻和文章的网站。它涵盖了广泛的技术主题,并提供深入的分析。
- 网址:https://lwn.net/
-
Patchwork
- 成立时间:2000 年代初
- 简介:Patchwork 由 OzLabs 创建,用于管理邮件列表中的补丁。它帮助开发者跟踪和处理提交的补丁。
- 网址:https://patchwork.kernel.org/
-
lore.kernel.org
- 成立时间:2018 年
- 简介:lore.kernel.org 是一个托管和搜索 Linux 内核相关邮件列表的平台,提供强大的搜索和索引功能,使开发者更容易找到相关讨论和补丁。
- 网址:https://lore.kernel.org/
-
本次示例在debian12上操作:
sudo apt install b4
b4 am -o - 20241008094325.896208-1-leitao@debian.org | git am -3直接使用b4 shazam命令获取补丁并应用:
b4 shazam https://lore.kernel.org/all/20260116045839.23743-1-realwujing@gmail.com/
使用b4 shazam 无缓存自动合并 v3 版补丁:
b4 shazam -v3 -C https://lore.kernel.org/all/20260116045839.23743-1-realwujing@gmail.com/
wget手动下载补丁并使用git am应用:
wget -qO- https://lore.kernel.org/all/20260120023234.77673-1-realwujing@gmail.com/raw | git am使用 b4 shazam 通过 Message-ID 强制指定并应用特定版本补丁:
b4 shazam -P _ https://lore.kernel.org/all/20260120023234.77673-1-realwujing@gmail.com/
使用 b4 shazam 自动应用指定版本的整个 patch series(多 patch):
# 即使是多 patch,如果不加 -P _,b4 也会“自作聪明”地根据线程启发式逻辑选择版本
# 最稳妥的方法是:指向该版本的 Cover Letter (0/N) URL,并强制指定 -P _
b4 shazam -P _ https://lore.kernel.org/all/cover.1737339732.git.realwujing@gmail.com/
避坑指南:
b4默认通过线程扫描“最新”补丁。如果你指定-v4,但b4误将v2识别为最新的v4(常见于邮件主题不规范或缓存干扰),它会合入错误版本。-P _(Pick exactly this) 是终极手段。它告诉b4:“别管线程里有什么,就给我处理这个特定 Message-ID 及其关联的系列。”- 处理多补丁系列时,将 URL 指向 Cover Letter (0/N) 并加
-P _是合入特定版本最稳准狠的方式。
-
The general rules about changelogs in the Submitting patches guide
- 品读 Linux 0.11 核心代码
- Linux内核完全注释(修正版v3.0).pdf
- 调试 Linux 最早期的代码
- Linux-0.11操作系统源码调试-在 Ubuntu22 上
- https://github.com/yuan-xy/Linux-0.11
dyndbg='file fs/xfs/* +p' debug在 Linux 内核启动参数中,debug 是一个 全局调试开关,它会显著增加内核运行时输出的日志量。以下是启用 debug 参数后,内核会输出的 主要日志类型 及其作用:
• 日志级别:强制设置为 KERN_DEBUG(级别 7),输出所有优先级 ≤7 的日志。
• 包含内容:
• 内核初始化流程(如 CPU 检测、内存映射)。
• 设备驱动加载(如存储控制器、USB、GPU)。
• 中断和调度事件。
• 文件系统挂载(如 ext4、XFS、btrfs)。
• 网络协议栈初始化。
• 触发条件:debug 会隐式激活部分内核模块的 动态调试输出(需模块支持)。
• 典型日志:
• 驱动探测(probe)和初始化细节。
• 硬件寄存器读写(如 PCIe 设备配置)。
• 文件系统元数据操作(如 XFS 的 inode 读写)。
• 块设备 I/O 请求(如磁盘读写队列)。
• SCSI/SATA/NVMe 磁盘检测。
• LVM/RAID 设备组装。
• 文件系统挂载错误(如 superblock 损坏)。
• 加密卷解锁(如 LUKS)。
• 网卡驱动加载(如 igb、e1000e)。
• IP 地址分配(DHCP 或静态)。
• 防火墙规则初始化(如 iptables/nftables)。
• CPU 频率调整(cpufreq)。
• ACPI 事件(如休眠/唤醒)。
如果同时使用 rd.debug,还会输出 initramfs 内部的详细操作:
• 设备节点创建(udev 规则执行)。
• 存储解密(如 cryptsetup)。
• 根文件系统挂载尝试。
• dracut 脚本的执行流程。
[    0.123456] DEBUG: CPU0: Intel(R) Core(TM) i7-9750H, 2600 MHz
[    0.234567] DEBUG: pci 0000:00:1f.2: [8086:15d7] type 00 class 0x010601
[    1.345678] DEBUG: XFS (sda1): Mounting V5 Filesystem
[    1.456789] DEBUG: scsi 2:0:0:0: Direct-Access     ATA      SSD 2TB        1.23 PQ: 0 ANSI: 5
[    2.567890] DEBUG: systemd[1]: Reading config file /etc/systemd/system.conf
- 日志量极大:
debug会导致日志刷屏,建议通过串口控制台或journalctl -k捕获。 - 性能影响:
生产环境慎用,可能降低启动速度。 - 需结合过滤工具:
使用grep或dmesg --level=debug聚焦关键问题:dmesg | grep -i "error\|fail\|warn\|xfs\|scsi"
| 参数 | 作用 | 日志范围 |
|---|---|---|
debug |
强制输出所有可用调试日志 | 全局(内核 + 支持动态调试的模块) |
loglevel=7 |
仅设置日志级别(不强制模块输出) | 依赖模块是否主动生成调试日志 |
dyndbg="file xxx +p" |
显式激活特定模块的调试日志 | 仅指定模块(如 fs/xfs/*) |
• debug 输出的日志:覆盖内核全局事件、驱动初始化、存储/网络操作等,优先级 ≤7 的所有信息。
• 适用场景:
• 系统启动失败、硬件兼容性问题、驱动加载异常。
• 需快速获取最大信息量时(无需逐一手动启用模块调试)。
• 优化建议:
若日志过多,可结合 dyndbg 限制范围(如 debug dyndbg="file fs/xfs/* +p")。
dyndbg="QUERY", module.dyndbg="QUERY", or ddebug_query="QUERY"三者的区别?
If foo module is not built-in, foo.dyndbg will still be processed at boot time, without effect, but will be reprocessed when module is loaded later. dyndbg_query= and bare dyndbg= are only processed at boot.
-
foo.dyndbg:
如果 foo 模块不是内核的一部分,而是在运行时可加载的模块,foo.dyndbg 的设置会在系统启动时被处理,但在此时不会产生实际效果。这是因为 foo 模块尚未加载,所以动态调试设置在这个时候并不影响任何东西。
当稍后加载 foo 模块时,foo.dyndbg 的设置会被重新处理并生效。因此,动态调试设置在模块加载后才真正生效。
-
dyndbg_query= 和 dyndbg=:
这两种设置(全局动态调试设置)只在系统启动时被处理,而不会在系统运行时重新处理。一旦系统进入运行状态,这些设置就不再生效。
这意味着如果你想要在系统运行时动态调整调试设置,你应该使用模块特定的设置,比如 foo.dyndbg,而不是全局设置。
综合来说,foo.dyndbg 在系统启动时会被处理,但不会在 foo 模块加载前生效。而 dyndbg_query= 和dyndbg= 这两种设置只在系统启动时生效,进入系统后不再生效。
在grub中新增 dyndbg 参数:
dyndbg='module phytium_dc_drm +p; module snd_soc_phytium_i2s +p; module snd_soc_pmdk_es8388 +p; module snd_soc_pmdk_es8336 +p; module snd_soc_pmdk_dp +p; file *usb* +p'update-grub进入系统后:
echo 'module phytium_dc_drm +p; module snd_soc_phytium_i2s +p; module snd_soc_pmdk_es8388 +p; module snd_soc_pmdk_es8336 +p; module snd_soc_pmdk_dp +p; file *usb* +p' > /sys/kernel/debug/dynamic_debug/control- GNU GRUB Manual 2.12
- 6.1 Simple configuration handling /etc/default/grub
- 17.3.1 serial
- 15 GRUB environment variables
/etc/default/grub示例配置:
GRUB_DEFAULT=saved
GRUB_SAVEDEFAULT=true
GRUB_TIMEOUT=5
GRUB_DISTRIBUTOR=`lsb_release -i -s 2> /dev/null || echo Debian`
GRUB_CMDLINE_LINUX_DEFAULT="quiet splash"
GRUB_CMDLINE_LINUX=""- 使用
ls命令列出分区:(hd0),(hd1),(hd1,gpt3),(hd1,gpt2),(hd1,gpt1)。 - 检查发现
vmlinuz和initramfs文件位于(hd1,gpt2)分区。 - 查看
(hd0,gpt3)/etc/fstab,确认根分区(/)挂载在/dev/sda3。 - 最终目标:手动加载内核并启动系统。
-
列出所有分区,确认文件位置
grub> ls
(hd0),(hd1),(hd1,gpt3),(hd1,gpt2),(hd1,gpt1)
检查
(hd1,gpt2)分区,确认包含vmlinuz和initramfs文件:grub> ls (hd1,gpt2)/假设输出显示
vmlinuz和initramfs存在。 -
设置根分区为包含内核的分区
将GRUB的root变量设置为(hd1,gpt2),因为内核文件在此分区:grub> set root=(hd1,gpt2) -
查找真正的根分区挂载点
查看(hd0,gpt3)上的/etc/fstab文件,确认系统的根分区(/):grub> cat (hd0,gpt3)/etc/fstab输出显示
/dev/sda3挂载到/,例如:# / was on /dev/sda3 during installation UUID=xxxx-xxxx-xxxx-xxxx / ext4 defaults 0 1 -
加载Linux内核
指定内核文件路径和根分区:grub> linux /vmlinuz root=/dev/sda3 ro/vmlinuz是内核文件(假设位于(hd1,gpt2)/vmlinuz)。root=/dev/sda3指定根分区。ro表示以只读模式启动。
-
加载initramfs文件
指定初始内存盘文件:grub> initrd /initramfs.img/initramfs.img是initramfs文件(假设位于(hd1,gpt2)/initramfs.img)。
-
启动系统
执行启动命令:grub> boot
使用 dracut 生成系统中所有内核版本的 initramfs:
for kernel_version in $(ls /lib/modules/); do
    dracut --force /boot/initramfs-${kernel_version}.img ${kernel_version}
done- 配置Grub2实现串口终端控制Linux系统
- Linux串口调试配置_GRUB串口通信_串口登陆
- 针对于grub的让开机信息重定向输出到串口上(内含精简操作指南)
- FT2000+模块在麒麟系统下串口输出功能调试
将GRUB输出重定向到串口步骤如下:
-
同时启用图形终端和串行终端,并设置了串行终端的参数
1 # Generated by deepin-installer  vim /etc/default/grub
2 GRUB_BACKGROUND="/boot/grub/themes/deepin-fallback/background.jpg"
3 GRUB_CMDLINE_LINUX_DEFAULT="video=efifb:nobgrt splash ignore_loglevel initcall_debug acpi.debug_layer=0x2 acpi.debug_level=0xffffffff no_console_suspend console=tty console=ttyAMA0,115200 dyndbg='module snd_soc_pmdk_dp +p; file *usb* +p' plymouth.ignore-serial-consoles"
4 GRUB_DEFAULT=0
5 GRUB_DISTRIBUTOR="`/usr/bin/lsb_release -d -s 2>/dev/null || echo Deepin`"
6 GRUB_THEME="/boot/grub/themes/deepin-fallback/theme.txt"
7 GRUB_TIMEOUT=5
8 GRUB_GFXMODE=
9 DEEPIN_GFXMODE_DETECT=1
10 GRUB_TERMINAL="console serial"
11 GRUB_SERIAL_COMMAND="serial --speed=115200 efi0 --word=8 --parity=no --stop=1"
在这个 GRUB 配置中,你配置了同时启用图形终端和串行终端,并设置了串行终端的参数。具体解释如下:
第 10 行 (GRUB_TERMINAL="console serial"): 这一行指示 GRUB 同时启用图形终端和串行终端。这意味着 GRUB 将能够在本地控制台(图形终端)和串行控制台(通过串行端口)上进行交互。
第 11 行 (GRUB_SERIAL_COMMAND="serial --speed=115200 --unit=0 --word=8 --parity=no --stop=1"): 这一行配置了串行终端的参数。具体的参数设置如下:
- --speed=115200:串行通信的波特率设置为 115200 比特每秒。
- --unit=0:串行端口的编号或单元号设置为 0,通常对应于 /dev/ttyS0 或 /dev/ttyAMA0,这是第一个串口。但比如loongarch、ft2000机器, 串口可能注册为了别的名字, 比如efi0。
- --word=8:数据位设置为 8 位。
- --parity=no:不使用奇偶校验。
- --stop=1:停止位设置为 1 位。
这个配置表明 GRUB 将同时在图形终端和串行终端上操作,并且串行终端的参数已设置为常见的串口通信配置。如果你的系统具有串行控制台(例如通过串口连接到终端服务器),这个配置允许你在本地和远程两个终端上查看 GRUB 菜单和启动过程。
-
最大程度开启grub调试信息
grub-editenv /boot/grub/grubenv set debug=all -
更新 GRUB 以应用更改
update-grub
在grub.cfg中查找内核启动选项:
grep -E "^menuentry" /boot/efi/EFI/ctyunos/grub.cfg

menuentry 'CTyunOS (4.19.90-2102.2.0.0070.1.all.rc5.ctl2.aarch64) 2 24.07' --class ctyunos --class gnu-linux --class gnu --class os --unrestricted $menuentry_id_option 'gnulinux-4.19.90-2102.2.0.0070.1.all.rc5.ctl2.aarch64-advanced-02de5198-45ec-4794-8a93-c4d2864f0e3b' {
menuentry 'Kylin V10 (V10) rescue (on /dev/mapper/klas-root)' --class gnu-linux --class gnu --class os $menuentry_id_option 'osprober-gnulinux-/vmlinuz-0-rescue-d9d667fdb84247168957a932c8c6a733--c16672cc-6d1d-4253-84b0-06e288652f4a' {
menuentry 'Kylin V10 (V10) (on /dev/mapper/klas-root)' --class gnu-linux --class gnu --class os $menuentry_id_option 'osprober-gnulinux-/vmlinuz-4.19.90-52.22.v2207.ky10.aarch64--c16672cc-6d1d-4253-84b0-06e288652f4a' {可以进一步使用awk 从 /boot/grub2/grub.cfg 文件中提取了 menuentry 行并显示相应的启动项名称:
awk -F\' '$1=="menuentry " {print i++ " : " $2}' /boot/efi/EFI/ctyunos/grub.cfgawk -F\' '$1=="menuentry " {print i++ " : " $2}' /boot/grub2/grub.cfg
0 : CTyunOS (4.19.90-2102.2.0.0076.ctl2.x86_64) 2 24.07
1 : CTyunOS (0-rescue-c59d31ab74dd4c4e95314c300589c91d) 2 24.07-F\':将单引号(')作为字段分隔符。这样,menuentry的名称(即系统引导项的名称)会出现在$2中。$1=="menuentry ":这个条件表示只处理以"menuentry "开头的行。$1是使用-F\'分隔符之后的第一部分,所以$1应该是"menuentry "。{print i++ " : " $2}:当匹配到"menuentry "行时,输出一个计数器i和$2(也就是menuentry的名称部分)。i++会在每次输出后递增,给每个菜单项分配一个编号。
root@debian:/boot/grub# awk -F"'" '/(menuentry|submenu) / { print i++ ": " $2 }' /boot/grub/grub.cfg

0: Debian GNU/Linux
1: Advanced options for Debian GNU/Linux
2: Debian GNU/Linux, with Linux 6.6.92
3: Debian GNU/Linux, with Linux 6.6.92 (recovery mode)
4: Debian GNU/Linux, with Linux 6.1.0-35-amd64
5: Debian GNU/Linux, with Linux 6.1.0-35-amd64 (recovery mode)
6: Debian GNU/Linux, with Linux 5.10.235
7: Debian GNU/Linux, with Linux 5.10.235 (recovery mode)
8: Debian GNU/Linux, with Linux 4.19.325
9: Debian GNU/Linux, with Linux 4.19.325 (recovery mode)
10: UEFI Firmware Settings
awk -F"'" '
/submenu / { submenu_id = i++; print submenu_id ": " $2; in_submenu=1; sub_i=0; next }
/menuentry / {
if (in_submenu) {
print submenu_id "." sub_i++ ": " $2
} else {
print i++ ": " $2
}
}
/^}/ { in_submenu=0 }
' /boot/grub/grub.cfg0: Debian GNU/Linux
1: Advanced options for Debian GNU/Linux
1.0: Debian GNU/Linux, with Linux 6.6.92
1.1: Debian GNU/Linux, with Linux 6.6.92 (recovery mode)
1.2: Debian GNU/Linux, with Linux 6.1.0-35-amd64
1.3: Debian GNU/Linux, with Linux 6.1.0-35-amd64 (recovery mode)
1.4: Debian GNU/Linux, with Linux 5.10.235
1.5: Debian GNU/Linux, with Linux 5.10.235 (recovery mode)
1.6: Debian GNU/Linux, with Linux 4.19.325
1.7: Debian GNU/Linux, with Linux 4.19.325 (recovery mode)
2: UEFI Firmware SettingsGRUB菜单项的索引是从0开始计算的,这意味着第一个菜单项的索引为0,第二个菜单项的索引为1,以此类推。
将第三个GRUB菜单项设置为默认启动项:
grub2-set-default 2grub2-editenv list
saved_entry=2
boot_success=0initcall_debug no_console_suspend ignore_loglevel initcall_blacklist=phytium_spi_driver_init module_blacklist=spi_phytium_plat dyndbg='module phytium_dc_drm +p; module snd_soc_phytium_i2s +p; module snd_soc_pmdk_es8388 +p; module snd_soc_pmdk_es8336 +p; module snd_soc_pmdk_dp +p; file *usb* +p'initcall_blacklist=phytium_spi_driver_initinitcall_blacklist= [KNL] Do not execute a comma-separated list of
initcall functions. Useful for debugging built-in
modules and initcalls.module_blacklist= [KNL] Do not load a comma-separated list of
modules. Useful for debugging problem modules.grubby 是一个用于管理和配置 Linux 系统的引导加载程序(主要针对 GRUB 和 GRUB2)的工具,通常用于修改内核启动参数、默认内核、引导条目等。它在许多基于 Red Hat 的发行版(如 RHEL、CentOS、Fedora)以及其他使用 GRUB 的系统中广泛使用。
-
功能:
- 查看、添加、删除或修改 GRUB 配置文件中的内核引导条目。
- 配置内核命令行参数(例如
ro、crashkernel或kfence.sample_interval)。 - 设置默认启动内核或调整引导顺序。
- 支持多内核管理,方便在系统上维护多个内核版本或配置。
-
常用场景:
- 更新 GRUB 配置以启用调试参数(如 KFENCE 或 KASAN)。
- 切换默认内核版本(例如从
5.10.0-136.12.0.90.kfence到5.10.0-136.12.0.90.kasan)。 - 添加硬件相关参数(如
iommu=pt或hugepages)。 - 管理救援模式(rescue mode)条目。
-
工作原理:
grubby解析 GRUB 配置文件(通常是/boot/grub/grub.cfg或/boot/grub2/grub.cfg)或相关的配置模板(/etc/grub.d/和/etc/default/grub)。- 修改配置后,
grubby可以自动更新 GRUB 的最终配置文件(通过调用grub2-mkconfig或直接编辑)。
-
常见命令:
grubby --info=ALL:列出所有 GRUB 引导条目的详细信息。grubby --default-kernel:显示当前默认启动的内核。grubby --set-default=<kernel>:设置默认启动内核。grubby --add-kernel=<kernel> --args=<args>:添加新内核条目并指定参数。grubby --update-kernel=<kernel> --args=<args>:更新指定内核的启动参数。
以下是一些与你的环境相关的 grubby 操作示例:
-
列出所有内核信息:
grubby --info=ALL

index=0
kernel=/boot/vmlinuz-5.10.0-136.12.0.90.kfence.ctl3.x86_64
args="ro console=ttyS0,115200n8 crashkernel=512M amd_iommu=on iommu=pt hugepagesz=1GB hugepages=869 default_hugepagesz=1GB pci=realloc modprobe.blacklist=virtio_blk"
root=UUID=81a77f8a-5e51-41a8-b6d4-419281e24974
initrd=/boot/initramfs-5.10.0-136.12.0.90.kfence.ctl3.x86_64.img
title=ctyunos (5.10.0-136.12.0.90.kfence.ctl3.x86_64) 23.01 2.1
index=1
kernel=/boot/vmlinuz-5.10.0-136.12.0.90.kasan.ctl3.x86_64
args="ro console=ttyS0,115200n8 crashkernel=512M amd_iommu=on iommu=pt hugepagesz=1GB hugepages=869 default_hugepagesz=1GB pci=realloc modprobe.blacklist=virtio_blk"
root=UUID=81a77f8a-5e51-41a8-b6d4-419281e24974
initrd=/boot/initramfs-5.10.0-136.12.0.90.kasan.ctl3.x86_64.img
title=ctyunos (5.10.0-136.12.0.90.kasan.ctl3.x86_64) 23.01 2.1
index=2
kernel=/boot/vmlinuz-5.10.0-136.12.0.90.ctl3.x86_64
args="ro console=ttyS0,115200n8 crashkernel=512M amd_iommu=on iommu=pt hugepagesz=1GB hugepages=869 default_hugepagesz=1GB pci=realloc modprobe.blacklist=virtio_blk"
root=UUID=81a77f8a-5e51-41a8-b6d4-419281e24974
initrd=/boot/initramfs-5.10.0-136.12.0.90.ctl3.x86_64.img
title=ctyunos (5.10.0-136.12.0.90.ctl3.x86_64) 23.01 2.1
index=3
kernel=/boot/vmlinuz-0-rescue-c6f9b8a106494102adaeca11a92de74f
args="ro console=ttyS0,115200n8 crashkernel=512M amd_iommu=on iommu=pt hugepagesz=1GB hugepages=869 default_hugepagesz=1GB pci=realloc modprobe.blacklist=virtio_blk"
root=UUID=81a77f8a-5e51-41a8-b6d4-419281e24974
initrd=/boot/initramfs-0-rescue-c6f9b8a106494102adaeca11a92de74f.img
title=ctyunos (0-rescue-c6f9b8a106494102adaeca11a92de74f) 23.01 2.1
index=4
non linux entry
index=5
non linux entry
index=6
non linux entry
输出所有内核的详细信息,包括版本、参数等。
-
查看默认内核:
grubby --default-kernel
输出当前默认启动的内核(可能是
/boot/vmlinuz-5.10.0-136.12.0.90.kfence.ctl3.x86_64)。 -
添加 KFENCE 参数:
grubby --update-kernel=/boot/vmlinuz-5.10.0-136.12.0.90.kfence.ctl3.x86_64 --args="kfence.sample_interval=200"将采样间隔设置为 200ms。
-
切换到 KASAN 内核:
grubby --set-default=/boot/vmlinuz-5.10.0-136.12.0.90.kasan.ctl3.x86_64
-
恢复默认参数(移除特定参数):
grubby --update-kernel=/boot/vmlinuz-5.10.0-136.12.0.90.kfence.ctl3.x86_64 --remove-args="kfence.sample_interval"
-
linux kernel: defconfig和.config
make savedefconfig
-
make clean      # 删除大多数的编译生成文件, 但是会保留内核的配置文件.config, 还有足够的编译支持来建立扩展模块
make mrproper   # 删除所有的编译生成文件, 还有内核配置文件, 再加上各种备份文件
make distclean  # mrproper删除的文件, 加上编辑备份文件和一些补丁文件
在 Linux 内核构建过程中,make deb-pkg 和 make bindeb-pkg 是用于生成 Debian 包的两个目标。这两个目标的主要区别在于生成的 Debian 包的内容和形式:
make deb-pkg:
- 这个目标生成的是一个包含完整内核源代码、配置文件和构建所需的所有内容的 Debian 源码包(source package)。
- Debian 源码包一般包括
linux-<version>.tar.xz源码压缩包、debian/ 目录中的维护文件以及其他构建所需的文件。这个包允许其他人在其系统上重新构建内核。 - 也包含
make bindeb-pkg产物。
make bindeb-pkg:
-
这个目标生成的是一个包含已编译内核二进制文件、头文件、模块、配置文件等内容的 Debian 二进制包(binary package)。
-
Debian 二进制包的形式为
linux-image-<version>_<architecture>.deb。这个包通常用于直接在 Debian 或基于 Debian 的系统上安装内核二进制文件,而不需要重新构建整个内核。
要在 x86 架构 的机器上使用 make bindeb-pkg 为 ARM 架构交叉编译内核 .deb 包,可以按照以下步骤进行设置:
在主机上安装交叉编译工具链和必要的软件包:
sudo apt update
sudo apt install gcc-arm-linux-gnueabi make dpkg-dev
如果目标是 64 位 ARM:
sudo apt install gcc-aarch64-linux-gnu确保你已经下载并解压了正确版本的 Linux 内核源码,例如:
wget https://cdn.kernel.org/pub/linux/kernel/v6.x/linux-6.9.tar.xz
tar -xf linux-6.9.tar.xz
cd linux-6.9为交叉编译设置工具链:
- 对于 32 位 ARM:
export ARCH=arm
export CROSS_COMPILE=arm-linux-gnueabi-
- 对于 64 位 ARM:
export ARCH=arm64
export CROSS_COMPILE=aarch64-linux-gnu-
加载适合目标设备的内核配置:
make ARCH=arm64 defconfig如果有特定的设备配置(比如从设备厂家获取的 .config 文件),可以直接复制到源码目录:
cp /path/to/your/.config .使用 bindeb-pkg 目标生成 .deb 包:
make ARCH=arm64 CROSS_COMPILE=aarch64-linux-gnu- bindeb-pkg -j$(nproc)编译完成后,生成的 .deb 包会出现在源码目录的上一级目录,例如:
../linux-image-6.9.0-arm64.deb
../linux-headers-6.9.0-arm64.deb- 内核配置的适配性
确保使用了正确的内核配置(.config),以支持目标 ARM 硬件。 - 模块支持
如果内核需要额外模块,确保在.config中启用对应选项。 - 检查工具链兼容性
工具链版本需与目标架构和内核源码兼容。
完成后,你可以将生成的 .deb 包传输到目标 ARM 设备上安装。
在debian12中下载内核源码:
apt source linux=6.1.55-1将内核原源码拷贝到deepin 23上:
rsync -avzP linux-6.1.55 wujing@10.20.53.48:~/code/linux-6.1.55-1在deepin 23 上构建deb包(包含 linux-perf):
cd code/linux-6.1.55-1/linux-6.1.55dpkg-buildpackage -b -nc -uc -us -j16- Ubuntu Debug Symbol Packages
- Linux内核调试的方式以及工具集锦
- 如何下载或安装 RHEL 系统的内核调试信息包?
- Linux 之十八 Ubuntu 22.04 配置内核版本、GRUB 引导、远程桌面、包后缀(-dev、-dbg等)
- (转载)ubuntu 安装 dbgsym (debug-info)
- dpkg-buildpackage error
-
本教程基于 openEuler 20.03
使用 yum-builddep 安装 Linux 内核的构建依赖项:
sudo yum-builddep kernel
也可以通过下方命令安装 Linux 内核的构建依赖项:
sudo yum install bison flex ncurses-devel elfutils-libelf-devel openssl-devel make rpm-build
编译内核rpm包:
make binrpm-pkg -j8 2> make_error.log
内核源码目录下执行:
#!/bin/bash

set -aex

# 进入内核源码所在目录
cd ~/code/linux

git restore .
git checkout ctkernel-lts-5.10/yuanql9/develop-amd-genoa
make distclean
git clean -fdx
git restore .

rm -rf /root/rpmbuild/SOURCES/kernel.tar.gz
tar --xform="s/^./kernel/" --exclude=".git" -chzf /root/rpmbuild/SOURCES/kernel.tar.gz .
cp build/* /root/rpmbuild/SOURCES

# 不要检查kabi变化
sed -i -E '0,/%define with_kabichk 1/! {/%define with_kabichk 1/s/1/0/}' build/kernel.spec

# 在版本号后面追加.amd.genoa.$(git rev-parse HEAD | head -c 12)
sed -i "/%global pkg_release/s/$/\.amd.genoa.$(git rev-parse HEAD | head -c 12)/" build/kernel.spec

# rpmbuild -ba build/kernel.spechttps://releases.linaro.org/components/toolchain/binaries/7.3-2018.05/arm-linux-gnueabihf/
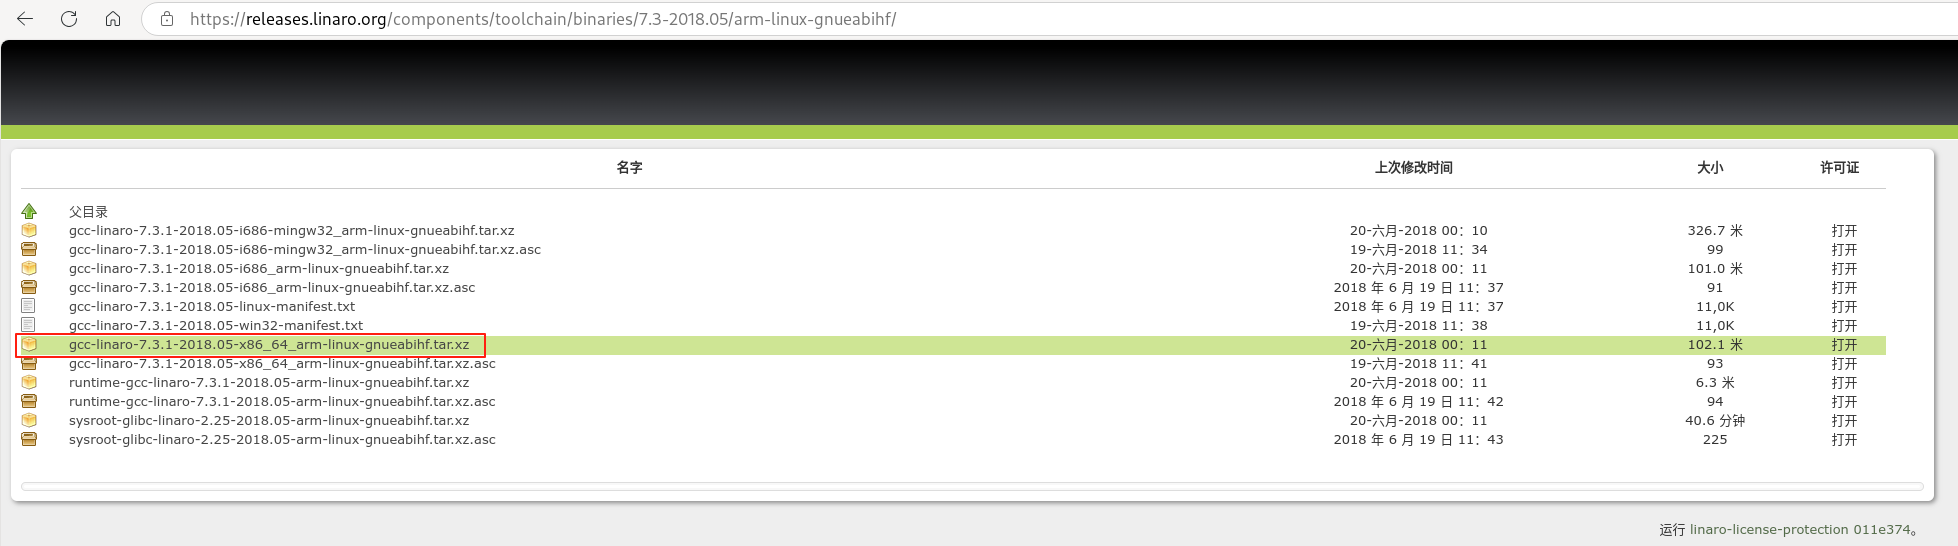
下载gcc-linaro-7.3.1-2018.05-x86_64_arm-linux-gnueabihf.tar.xz并解压:
tar -xJf gcc-linaro-7.3.1-2018.05-x86_64_arm-linux-gnueabihf.tar.xz
export CROSS_COMPILE=/root/Downloads/gcc-linaro-7.5.0-2019.12-x86_64_arm-linux-gnueabihf/bin/arm-linux-gnueabihf-
export ARCH=arm64
make openeuler_defconfig
make binrpm-pkg -j32
建议使用下方gcc-arm-10.3-2021.07-x86_64-aarch64-none-linux-gnu进行交叉编译。
https://blog.csdn.net/qq_37200742/article/details/128331909
https://developer.arm.com/downloads/-/arm-gnu-toolchain-downloads
https://developer.arm.com/downloads/-/gnu-a#panel4a
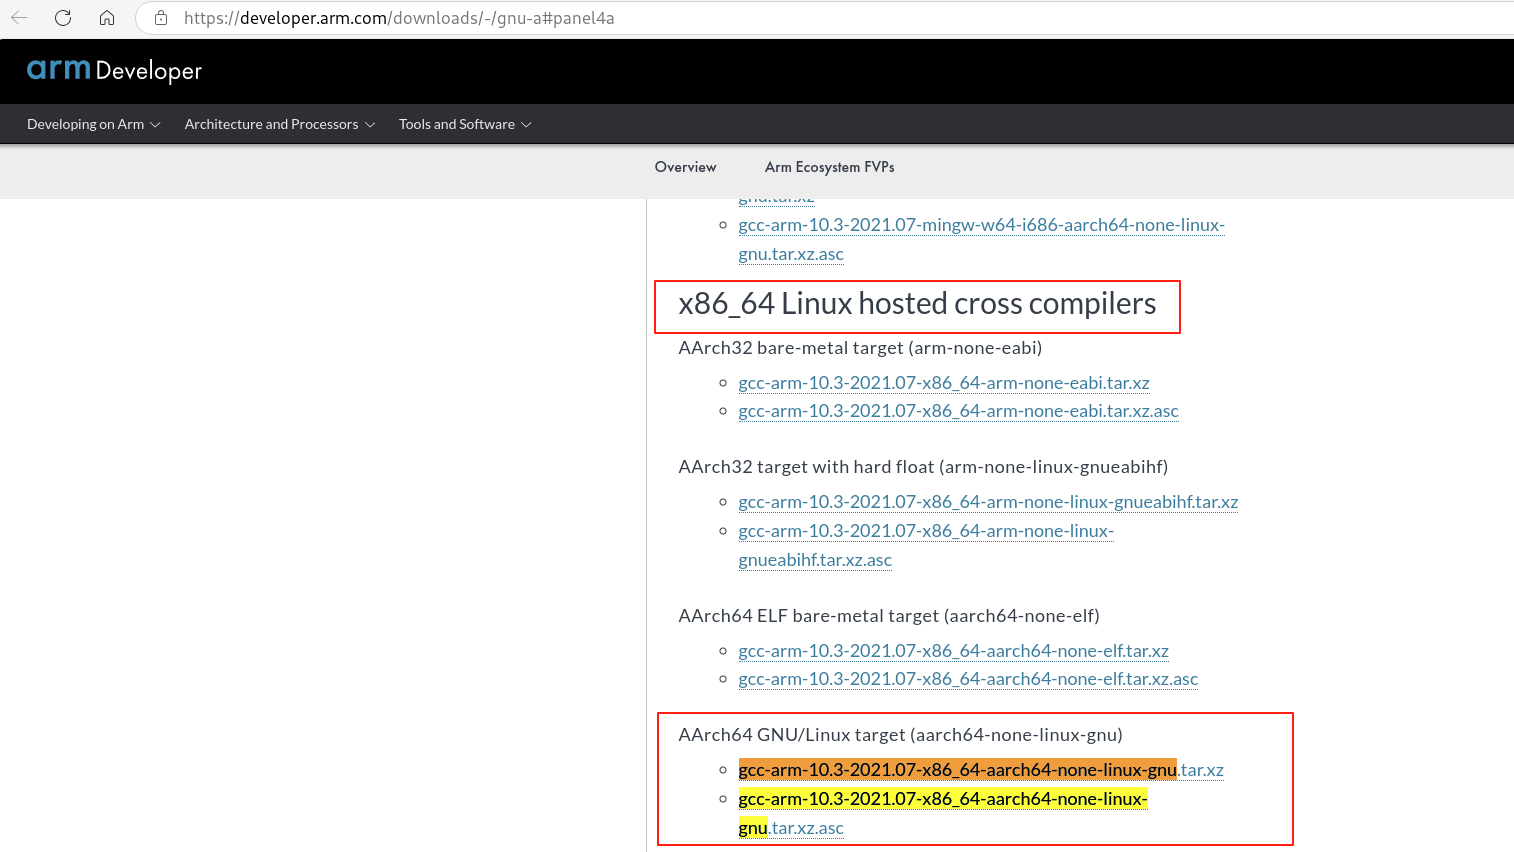
在浏览器中下载上述gcc-arm-10.3交叉编译工具链后进行如下操作:
cp /root/Downloads/gcc-arm-10.3-2021.07-x86_64-aarch64-none-linux-gnu.tar.xz /root
tar -xJf gcc-arm-10.3-2021.07-x86_64-aarch64-none-linux-gnu.tar.xz
export CROSS_COMPILE=/root/Downloads/gcc-arm-10.3-2021.07-x86_64-aarch64-none-linux-gnu/bin/aarch64-none-linux-gnu-
export ARCH=arm64
make openeuler_defconfig
make binrpm-pkg -j32
rpmbuild -ba --target=aarch64 build/kernel.spec --define "_host_cpu aarch64"
也可使用rpmbuild交叉编译的方式:
# 搭建交叉编译环境
mkdir -p /root/Downloads/cross_compile
cd /root/Downloads/cross_compile
wget -O gcc-arm-10.3-2021.07-x86_64-aarch64-none-linux-gnu.tar.xz "https://developer.arm.com/-/media/Files/downloads/gnu-a/10.3-2021.07/binrel/gcc-arm-10.3-2021.07-x86_64-aarch64-none-linux-gnu.tar.xz?rev=1cb9c51b94f54940bdcccd791451cec3&hash=B380A59EA3DC5FDC0448CA6472BF6B512706F8EC"
tar -xJf gcc-arm-10.3-2021.07-x86_64-aarch64-none-linux-gnu.tar.xz

# 编译内核(由于zlib缺失,无法编译bpftool等,需要改动kernel.spec)
cd /root/code/linux
git cherry-pick 69478eae21ab # 69478eae21ab 在分支 ctkernel-lts-5.10/yuanql9/develop-cross-compile中
export CROSS_COMPILE=/root/Downloads/cross_compile/gcc-arm-10.3-2021.07-x86_64-aarch64-none-linux-gnu/bin/aarch64-none-linux-gnu-
export ARCH=arm64
time rpmbuild -ba --target=aarch64 --define "_host_cpu aarch64" --without=bpftool --without=perf --without=kvm_stat build/kernel.specCROSS_PREFIX=/root/Downloads/cross_compile/gcc-arm-10.3-2021.07-x86_64-aarch64-none-linux-gnu/bin/aarch64-none-linux-gnu- ./configure --prefix=/root/Downloads/cross_compile/usr/local
make
make install
export PKG_CONFIG_PATH=/root/Downloads/cross_compile/usr/local/lib/pkgconfig:$PKG_CONFIG_PATH
export LD_LIBRARY_PATH=/root/Downloads/cross_compile/usr/local/lib:$LD_LIBRARY_PATH
export CFLAGS="-I/root/Downloads/cross_compile/usr/local/include $CFLAGS"
export LDFLAGS="-L/root/Downloads/cross_compile/usr/local/lib $LDFLAGS"export CROSS_COMPILE=/root/Downloads/cross_compile/gcc-arm-10.3-2021.07-x86_64-aarch64-none-linux-gnu/bin/aarch64-none-linux-gnu-
export ARCH=arm64
time rpmbuild -ba --target=aarch64 --define "_host_cpu aarch64" build/kernel.spec交叉编译bpftool、perf、kvm_stat还有问题,故暂时采用上一小节改动kernel.spec使用rpmbuild -ba --target=aarch64 --define "_host_cpu aarch64" --without=bpftool --without=perf --without=kvm_stat build/kernel.spec方式进行交叉编译。
-
Linux内核驱动学习-编写最简单Linux内核模块HelloWorld
KVERS = $(shell uname -r)
# Kernel modules
obj-m += hello.o
# Specify flags for the module compilation.
#EXTRA_CFLAGS=-g -O0
build: kernel_modules
kernel_modules:
	make -C /lib/modules/$(KVERS)/build M=$(CURDIR) modules
clean:
	make -C /lib/modules/$(KVERS)/build M=$(CURDIR) clean
-
make CONFIG_SPI_PHYTIUM_PLAT=m -C /data3/home/yuanqiliang/code/arm-kernel-5.10/kernel M=/data3/home/yuanqiliang/code/arm-kernel-5.10/kernel/drivers/spi modules
- GUN C编译器拓展语法学习笔记(一)GNU C特殊语法部分详解
- GUN C编译器拓展语法学习笔记(二)属性声明
- GUN C编译器拓展语法学习笔记(三)内联函数、内建函数与可变参数宏
- 两种 C 语言之间的差异
- linux内核中6个经典C语言函数代码赏析
- Linux内核中常用的C语言技巧
- 弱符号__attribute__((weak))
- linux kernel中__setup()函数介绍
__VA_ARGS__ 是一个在宏定义中使用的预处理器标识符,用于表示可变数量的参数。它允许在宏中接受并处理任意数量的参数。
-
用途: 处理可变参数列表。
-
语法:
__VA_ARGS__在宏定义中占位,表示传递给宏的所有额外参数。 -
示例:
#define PRINT(fmt, ...) printf(fmt, __VA_ARGS__)
使用宏
PRINT可以传递任意数量的参数:PRINT("Value: %d\n", 42); PRINT("Values: %d, %d\n", 1, 2);
在宏 PRINT 中,fmt 是格式化字符串,而 __VA_ARGS__ 被替换为 printf 的其他参数。
- 为什么有人说在现代计算机体系中「链表已死」?
- 玩转内核链表list_head,教你管理不同类型节点的实现,建议收藏
- Linux内核中经典链表 list_head 常见使用方法解析
- Linux内核中的常用宏container_of其实很简单
- Linux内核中container_of的原理及其使用详解
- Linux 内核 hlist 详解
- hlist用法以及hlist_for_each_entry 使用举例
在Linux的GRUB启动配置中,可以通过 initramfs调试参数 来排查系统启动问题(如文件系统挂载失败、驱动加载问题等)。以下是常用的调试参数及其作用:
- dracut.cmdline - dracut kernel command line options
- initramfs-tools - an introduction to writing scripts for mkinitramfs
• 作用:启用 dracut(或 initramfs)的详细调试日志。
• 示例:
rd.debug
• 输出:显示 initramfs 阶段的所有脚本执行过程,适合排查启动流程问题。
• 作用:在 initramfs 启动过程中暂停,进入交互式 Shell。
• 常用断点:
rd.break=pre-mount   # 在挂载根文件系统前暂停
rd.break=pre-pivot   # 在切换到真实根文件系统前暂停
rd.break=pre-trigger # 在 systemd 启动前暂停
• 使用方式:
- 在 GRUB 启动菜单按
e编辑内核参数,添加rd.break=pre-mount。 - 启动后会进入
initramfs的 Shell,可手动执行命令(如mount、lsblk)。 - 输入
exit继续启动。
• 作用:如果 initramfs 启动失败,自动进入紧急 Shell。
• 示例:
rd.shell
• 适用场景:系统无法挂载根文件系统时,手动修复。
• 作用:打印 initramfs 阶段的所有内核初始化调用(initcall)。
• 示例:
rd.initcall.debug
• 适用场景:排查驱动加载顺序问题。
• 作用:黑名单或优先加载特定驱动。 • 示例:
rd.driver.blacklist=nouveau  # 禁用 nouveau 驱动
rd.driver.pre=ahci           # 优先加载 ahci 驱动
• 适用场景:驱动冲突或加载失败时调试。
• 作用:延长 initramfs 等待根设备的时间(秒)。
• 示例:
rootdelay=30
• 适用场景:慢速存储设备(如 USB/NAS)需要更长时间初始化。
• 作用:手动指定 LVM 卷组或逻辑卷。 • 示例:
rd.lvm.vg=vg00 rd.lvm.lv=vg00/root
• 适用场景:LVM 设备未被自动激活时。
• 作用:将 Live CD 的 initramfs 完全加载到内存。
• 示例:
rd.live.ram
• 适用场景:调试 Live 系统启动问题。
• 作用:手动指定 LUKS 加密设备的 UUID。 • 示例:
rd.luks.uuid=1234-5678-90ab-cdef
• 适用场景:加密设备未被自动解锁时。
• 作用:手动指定软 RAID(mdadm)设备的 UUID。
• 示例:
rd.md.uuid=abcd1234:5678ef90
• 适用场景:RAID 设备未被自动组装时。
rd.debug rd.break=pre-mount rootdelay=30
• 作用:
• 打印详细日志(rd.debug)。
• 在挂载根文件系统前暂停(rd.break=pre-mount)。
• 延长设备等待时间(rootdelay=30)。
rd.debug rd.lvm.vg=vg00 rd.luks.uuid=1234-5678
• 作用:
• 打印详细日志(rd.debug)。
• 手动指定 LVM 卷组(rd.lvm.vg)。
• 手动指定 LUKS 设备 UUID(rd.luks.uuid)。
-
在 GRUB 启动菜单编辑内核参数: • 启动时按
e进入编辑模式。 • 在linux或linux16行末尾添加调试参数(如rd.debug rd.break=pre-mount)。 • 按Ctrl+X或F10启动。 -
永久修改 GRUB 配置(谨慎操作):
sudo nano /etc/default/grub
• 修改
GRUB_CMDLINE_LINUX,例如:GRUB_CMDLINE_LINUX="rd.debug rd.shell"• 更新 GRUB:
sudo update-grub   # Debian/Ubuntu
sudo grub2-mkconfig -o /boot/grub2/grub.cfg  # RHEL/CentOS
• 查看日志:
• dmesg:内核日志。
• journalctl -xb:systemd 日志。
• /run/initramfs/init.log:dracut 日志(需在 initramfs Shell 中查看)。
• 手动挂载根文件系统(在 rd.break Shell 中):
mkdir /mnt/root
mount /dev/mapper/vg00-root /mnt/root  # 替换为实际设备
chroot /mnt/root # 切换到真实根文件系统| 参数 | 作用 | 适用场景 |
|---|---|---|
rd.debug |
打印详细日志 | 排查 initramfs 流程问题 |
rd.break |
进入调试 Shell | 手动修复挂载/驱动问题 |
rd.shell |
启动失败时进入 Shell | 紧急修复 |
rootdelay |
延长设备等待时间 | 慢速存储设备 |
rd.lvm.vg |
手动指定 LVM | LVM 未自动激活 |
rd.luks.uuid |
手动指定 LUKS | 加密设备未解锁 |
通过合理组合这些参数,可以高效定位和解决 initramfs 阶段的启动问题。
- Linux 驱动开发 二:module_init机制
- initcall 机制
- linux内核中do_initcalls函数的执行逻辑分析
- initcall_debug来查看开机慢问题
- Linux 各种 initcall 的调用原理
- 【Linux内核源码分析】initcall机制与module_init
-
安装 POSIX 系统帮助手册:
sudo apt-get install manpages-posix-dev
查看所有系统调用:
man syscalls
查看open系统调用:
man open
man 2 open
- 理解Effective UID(EUID)和Real UID(RUID)
- Linux进程的uid和euid
- geteuid()和getuid()的区别
- getuid() 与 geteuid() 获得 UID 以及 有效 UID 值
- linux c setuid函数解析
- 如何测试Linux内核?
- KUnit和kselftest的区别
- 关于kunit的一点够用就行知识概念
- KUnit - Linux Kernel Unit Testing
- 深入了解KUnit:Linux内核新一代单元测试工具(上)
- LWN:Linux kernel要有几种test framework?
Linux 内核单元测试主要通过两大框架:
-
Kselftest:
- 适用于集成测试和功能测试,支持用户空间和内核空间交互。
- 测试代码在
tools/testing/selftests/目录,运行命令:make -C tools/testing/selftests run_tests。
-
KUnit:
- 轻量级单元测试框架,专注内核态的单元测试。
- 测试代码在
lib/kunit/,运行命令:./tools/testing/kunit/kunit.py run。
Kselftest 适合功能测试,KUnit 适合内核模块的单元测试。
在 Linux 4.19.90 内核源码中开启 gcov (代码覆盖率分析工具)需要设置以下编译选项:
CONFIG_GCOV_KERNEL=y
CONFIG_GCOV_PROFILE_ALL=y- CONFIG_GCOV_KERNEL: 启用内核模块的代码覆盖率分析。
- CONFIG_GCOV_PROFILE_ALL: 对所有内核子系统启用代码覆盖率分析。
编译内核后安装重启。
进入到内核源码目录:
cd /home/wujing/code/linux-y
sudo -s
gcov kernel/gcov/base.c -o /sys/kernel/debug/gcov/home/wujing/code/linux-y/kernel/gcov
File 'kernel/gcov/base.c'Lines executed:65.22% of 46
Creating 'base.c.gcov'
File 'include/linux/module.h'Lines executed:100.00% of 5Creating 'module.h.gcov'gcov net/ipv4/xfrm4_state.c -o /sys/kernel/debug/gcov/home/wujing/code/linux-y/net/ipv4/
File 'include/net/xfrm.h'
Lines executed:0.00% of 20
Creating 'xfrm.h.gcov'
File 'net/ipv4/xfrm4_state.c'
Lines executed:7.50% of 40
Creating 'xfrm4_state.c.gcov'
File 'include/linux/skbuff.h'
Lines executed:0.00% of 1
Creating 'skbuff.h.gcov'
File 'include/linux/string.h'
Lines executed:0.00% of 6
Creating 'string.h.gcov'
File 'include/net/net_namespace.h'
Lines executed:0.00% of 1
Creating 'net_namespace.h.gcov'gcov init/main.c -o /sys/kernel/debug/gcov/home/wujing/code/linux-y/init
File 'init/main.c'
Lines executed:70.57% of 367
Creating 'main.c.gcov'本教程以openeuler-4-19为例,编译安装测试内核。
cd ~/code/openeuler-4-19
git checkout -b 95170c1fb40c 95170c1fb40ccd build/spec
diff -u kernel.spec.bak kernel.spec
--- kernel.spec.bak 2024-07-29 16:43:55.850551849 +0800
+++ kernel.spec 2024-07-29 14:47:21.439102425 +0800
@@ -24,7 +24,7 @@
Name: kernel
Version: 4.19.90
-Release: %{hulkrelease}.0068
+Release: %{hulkrelease}.0068.ksmd
Summary: Linux Kernel
License: GPLv2
URL: http://www.kernel.org/yum-builddep -y kernel.speccd ../../pwd
/home/wujing/code/openeuler-4-19/build/spec./build/build.sh
Wrote: /home/wujing/rpmbuild/RPMS/x86_64/bpftool-debuginfo-4.19.90-2102.2.0.0068.ksmd.ctl2.x86_64.rpm
Wrote: /home/wujing/rpmbuild/RPMS/x86_64/python3-perf-4.19.90-2102.2.0.0068.ksmd.ctl2.x86_64.rpm
Wrote: /home/wujing/rpmbuild/RPMS/x86_64/python2-perf-4.19.90-2102.2.0.0068.ksmd.ctl2.x86_64.rpm
Wrote: /home/wujing/rpmbuild/RPMS/x86_64/kernel-tools-devel-4.19.90-2102.2.0.0068.ksmd.ctl2.x86_64.rpm
Wrote: /home/wujing/rpmbuild/RPMS/x86_64/kernel-tools-4.19.90-2102.2.0.0068.ksmd.ctl2.x86_64.rpm
Wrote: /home/wujing/rpmbuild/RPMS/x86_64/kernel-tools-debuginfo-4.19.90-2102.2.0.0068.ksmd.ctl2.x86_64.rpm
Wrote: /home/wujing/rpmbuild/RPMS/x86_64/python3-perf-debuginfo-4.19.90-2102.2.0.0068.ksmd.ctl2.x86_64.rpm
Wrote: /home/wujing/rpmbuild/RPMS/x86_64/python2-perf-debuginfo-4.19.90-2102.2.0.0068.ksmd.ctl2.x86_64.rpm
Wrote: /home/wujing/rpmbuild/RPMS/x86_64/bpftool-4.19.90-2102.2.0.0068.ksmd.ctl2.x86_64.rpm
Wrote: /home/wujing/rpmbuild/RPMS/x86_64/perf-4.19.90-2102.2.0.0068.ksmd.ctl2.x86_64.rpm
Wrote: /home/wujing/rpmbuild/RPMS/x86_64/perf-debuginfo-4.19.90-2102.2.0.0068.ksmd.ctl2.x86_64.rpm
Wrote: /home/wujing/rpmbuild/RPMS/x86_64/kernel-devel-4.19.90-2102.2.0.0068.ksmd.ctl2.x86_64.rpm
Wrote: /home/wujing/rpmbuild/RPMS/x86_64/kernel-4.19.90-2102.2.0.0068.ksmd.ctl2.x86_64.rpm
Wrote: /home/wujing/rpmbuild/RPMS/x86_64/kernel-debugsource-4.19.90-2102.2.0.0068.ksmd.ctl2.x86_64.rpm
Wrote: /home/wujing/rpmbuild/RPMS/x86_64/kernel-source-4.19.90-2102.2.0.0068.ksmd.ctl2.x86_64.rpm
Wrote: /home/wujing/rpmbuild/RPMS/x86_64/kernel-debuginfo-4.19.90-2102.2.0.0068.ksmd.ctl2.x86_64.rpmcp kernel/sched/fair.c kernel/sched/fair.c.orig
git checkout master
# patch文件路径(patch文件必须支持在kernel-source路径下通过patch -p1的方式修改源码)
diff -uNap openeuler-4-19/kernel/sched/fair.c.orig openeuler-4-19/kernel/sched/fair.c > openeuler-4-19/kernel/sched/fair.c.patchyum install -y git rpm-build elfutils-libelf-devel gdb-headless
git clone https://gitee.com/src-openeuler/kpatch.git
git checkout -b origin/openEuler-22.03-LTS-SP3 remotes/origin/openEuler-22.03-LTS-SP3
mkdir -p ~/rpmbuild/SOURCES/
/bin/cp kpatch/* ~/rpmbuild/SOURCES/
rpmbuild -ba kpatch/kpatch.spec
rpm -Uvh ~/rpmbuild/RPMS/`arch`/kpatch*.rpm
rpm -Uvh ~/rpmbuild/RPMS/noarch/kpatch*.rpm安装依赖软件包:
yum install -y make gcc patch bison flex openssl-devel kpatch kpatch-runtime elfutils-libelf-devel安装当前内核源码和开发包(这里是上面带ksmd的rpmb包):
yum install -y kernel-source-`uname -r` kernel-debuginfo-`uname -r` kernel-devel-`uname -r`cd /opt/patch_workspace
rm -rf kernel-source .config
ln -s /usr/src/linux-`uname -r`/ kernel-source
ln -s /usr/src/linux-`uname -r`/.config .config
ln -s /usr/lib/debug/lib/modules/`uname -r`/vmlinux vmlinux给make_hotpatch执行权限:
sudo chmod +x make_hotpatchsudo cp ~/code/openeuler-4-19/kernel/sched/fair.c.1.patch .sudo ./make_hotpatch -i fairisolcpus -p fair.c.patch
kernel version:4.19.90-2102.2.0.0068.ksmd.ctl2.x86_64
Using source directory at /usr/src/linux-4.19.90-2102.2.0.0068.ksmd.ctl2.x86_64
Testing patch file(s)
Reading special section data
Building original source
Building patched source
Extracting new and modified ELF sections
fair.o: changed function: select_idle_sibling
Patched objects: vmlinux vmlinux
Building patch module: klp_fairisolcpus.ko
SUCCESS补丁制作完成,补丁文件以压缩包的格式存放于/opt/patch_workspace/hotpatch目录下。
cd hotpatchsudo livepatch -l klp_fairisolcpus.tar.gz
insmod /lib/modules/hotpatch.227734/klp_fairisolcpus/klp_fairisolcpus.ko
install patch klp_fairisolcpus.tar.gz successsudo livepatch -a fairisolcpus
active patch klp_fairisolcpus successsudo livepatch -d fairisolcpus
deactive patch klp_fairisolcpus successsudo livepatch -r fairisolcpus
remove patch klp_fairisolcpus success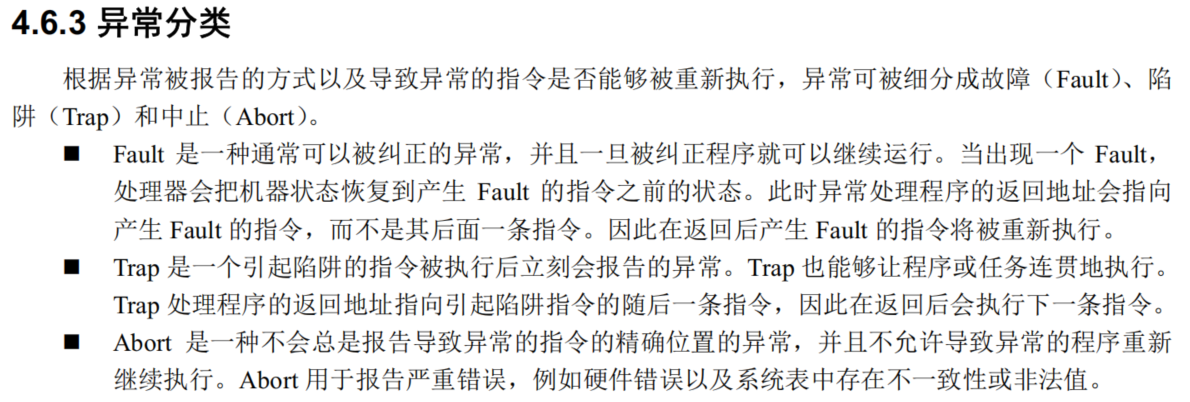
根据图片中关于 异常分类(Fault/Trap/Abort) 的详细定义,我将用更具体的 代码示例 和 执行流程 来演示这三类异常的区别,并结合底层机制进行解析。
程序访问一个未加载到物理内存的虚拟地址,触发缺页异常。
// 示例代码(C语言)
int *ptr = (int *)0x1000;  // 假设 0x1000 是未映射的虚拟地址
int value = *ptr; // 触发 Page Fault- 异常触发:
CPU 执行mov eax, [0x1000]时,发现该地址未映射到物理内存,触发 Fault 类异常。 - 状态恢复:
• CPU 保存当前状态(寄存器、指令指针等),并将返回地址指向 导致 Fault 的指令(即mov eax, [0x1000])。
• 控制权转交给操作系统的缺页处理程序。 - 纠正处理:
• 操作系统从磁盘加载缺失的页到内存,并更新页表。 - 重新执行:
• 返回后,CPU 重新执行原指令,此时内存访问成功,程序继续运行。
• Fault 的返回地址指向 原指令,确保纠正后能重试。
• 可恢复,是 被动触发的异常(如缺页、除零)。
用户程序通过 int 0x80 或 syscall 指令主动触发系统调用。
; 示例代码(汇编)
mov eax, 4       ; 系统调用号(write)
mov ebx, 1       ; 文件描述符(stdout)
mov ecx, msg     ; 字符串地址
mov edx, len     ; 字符串长度
int 0x80 ; 触发 Trap,进入内核态- 异常触发:
CPU 执行int 0x80后,检测到 Trap 类异常,切换到内核态。 - 内核处理:
• CPU 保存当前状态,并将返回地址指向 下一条指令(即int 0x80之后的指令)。
• 内核根据eax中的系统调用号执行write()函数。 - 恢复执行:
• 系统调用完成后,CPU 返回到用户态,继续执行int 0x80的下一条指令。
• Trap 的返回地址指向 下一条指令,用于 主动触发的连贯操作(如系统调用、调试断点)。
• 必须 完整执行原指令 后才触发。
CPU 在处理一个异常时又遇到另一个异常(如页表损坏或栈溢出),触发 Double Fault(双重故障)。
// 示例场景:内核栈溢出导致无法处理缺页异常
void recursive_function() {
    recursive_function();  // 无限递归,栈溢出
}- 首次异常:
• 程序触发缺页异常(Fault),CPU 尝试调用缺页处理程序。 - 二次异常:
• 处理缺页时发现内核栈已耗尽,无法保存状态,触发 Abort(Double Fault)。 - 系统终止:
• CPU 无法恢复现场,直接跳转到 中止处理程序(如重启或蓝屏)。
• Abort 不提供返回地址,因为无法定位错误指令或恢复状态。
• 通常由 硬件或内核级严重错误 引起(如内存校验失败、CPU 非法状态)。
| 异常类型 | 触发时机 | 返回地址 | 是否可恢复 | 典型场景 |
|---|---|---|---|---|
| Fault | 指令执行前 | 原指令 | 是 | 缺页异常、除零错误 |
| Trap | 指令执行后 | 下一条指令(JMP等指令例外) | 是 | 系统调用、调试断点 |
| Abort | 无法定位指令 | 无(程序终止) | 否 | 硬件故障、内核栈溢出 |
A: 系统调用是 程序主动发起的请求,需要在完整执行 int 0x80 后进入内核态,并确保返回时继续执行后续代码。Fault 的“重试”机制不适用于此场景。
A: 多数情况下是 Fault(如访问非法地址时可被 SIGSEGV 捕获),但若内核无法处理(如页表损坏),可能升级为 Abort。