Setup
If you're here for the first time, welcome! We're really happy to see another radio enthusiast interested in this project.
Before we dive in, a couple of things worth knowing:
BotWave is a console application. That means it won't open a graphical interface like you might be used to. Instead, you'll be working in a terminal (a text-based window where you type commands). Once BotWave is running, you'll see a prompt like botwave > where you type commands to control it. This might feel unfamiliar at first, but it's genuinely simpler than it looks, and you'll get used to it quickly.
Take it one step at a time. BotWave can do a lot, and it's easy to feel overwhelmed if you try to understand everything at once. You don't have to. Follow this guide step by step, and only move on to the next thing when you're comfortable. The wiki will still be here when you're ready.
BotWave has an automatic install script for Debian-based systems (Raspberry Pi OS, Ubuntu, etc.).
curl -sSL https://botwave.dpip.lol/install | sudo bash
sudois required for system-wide installation. If you'd prefer not to pipe directly to bash, you can download and review the script first:curl -sSL https://botwave.dpip.lol/install -o bw_install.sh cat bw_install.sh sudo bash bw_install.sh
During installation you'll be asked:
- Installation type: See below for which one to pick.
-
ALSA loopback card: Only needed for live broadcasting. If you're just playing audio files, skip it. You can enable it later with
--alsa.
Which installation type should I pick?
| Mode | Pick this if... |
|---|---|
client |
You have a Raspberry Pi and want to broadcast (with or without a server) |
server |
You have a non-Pi machine that will manage other Pis |
both |
You want to run both on the same machine |
Not on a Debian-based system? Check the Manual Installation guide.
Note
Alternatively, if you don't want to use our services, for privacy or unavailability reasons, you can either directly download the file from the GitHub repo: install.sh, or directly replace [...]botwave.dpip.lol[...] with https://raw.githubusercontent.com/dpipstudio/botwave/refs/heads/main/scripts/install.sh in the install url.
Tip
One Raspberry Pi?: Follow the Local Client path.
Multiple Raspberry Pis?: Follow the Client-Server path.
The local client runs entirely on one Raspberry Pi, so no server or second machine needed.
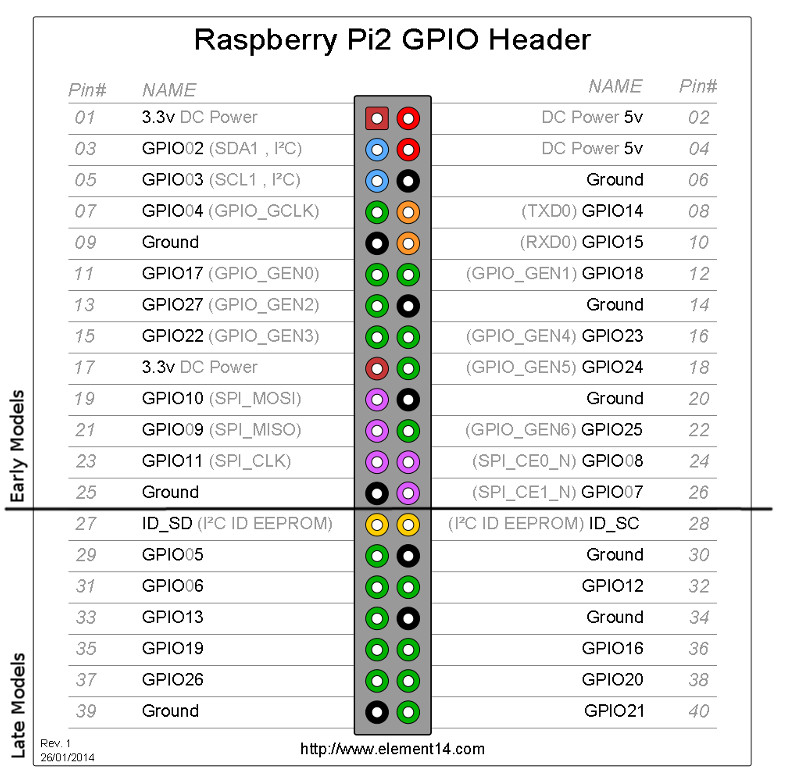
Plug a wire into GPIO 4 (pin 7) on your Pi. For FM frequencies, a length of around 69-85cm works best. Without any wire, range will be very limited.
Example images
Raspberry Pi GPIO layout:
Example on a Pi 3:

sudo bw-localIf everything went well, you should see a botwave > prompt after some startup logs.
Expected result
BotWave Local Client[OK] Found bw_custom at: /opt/BotWave/backends/bw_custom/src/bw_custom [INFO] Type 'help' for a list of available commands
botwave ›
Head over to Main/Basic Usage to start broadcasting.
This setup lets you control multiple Raspberry Pis from a central machine. You'll need at least one server machine and one Raspberry Pi, both on the same network (or with the right ports open if connecting over the internet).
On your server machine, install BotWave with the server mode, then start it:
bw-serverYou should see a botwave > prompt after startup.
Expected result
[dpip@botwave-server] ~ › bw-server BotWave - Server[TLS] Generated self-signed TLS certificate [SERVER] WebSocket server started on wss://0.0.0.0:9938 [SERVER] HTTP file server started on https://0.0.0.0:9921 [SERVER] BotWave Server started [VER] Protocol Version: 2.0.2 [INFO] Checking for protocol updates... [OK] You are using the latest protocol version Type 'help' for commands
botwave ›
You'll need your server's IP address or hostname to connect the Pi to it.
Same network (server and Pi on the same WiFi/LAN)
In the BotWave prompt on your server, run: ``` < echo "Local Host:
Note this down: prefer the IP over the hostname, it's more reliable.
Different network (server is a VPS or remote machine)
First, make sure ports `9938` and `9921` (TCP) are open and reachable from the internet. You may need to configure your firewall or router port forwarding.
Then in the BotWave prompt, run:
< echo "FQDN: $(hostname -f), Public IP: $(curl -s4 https://ifconfig.me)"
You'll get something like: FQDN: botwave.dpip.lol, Public IP: 1.1.1.1
Plug a wire into GPIO 4 (pin 7) on your Raspberry Pi. For FM frequencies, a length of around 69-85cm works best.
Example images
Raspberry Pi GPIO layout:
Example on a Pi 3:
On your Raspberry Pi, run:
sudo bw-client 192.168.1.69 # replace with your server's IPIf the connection succeeds, you'll see this on the Pi:
[OK] WebSocket connected, registering...
[OK] Registered as: botwave-client_192.168.1.96
And this on the server:
[OK] Client registered: botwave-client (botwave-client_192.168.1.96)
Head over to Main/Basic Usage to start broadcasting.